Run Concurrent program without Using SRS Window Part2

Step3:
Add the function to Menu.
Copy the User Function Name and open the Menu’s form and attach the function to menu.

Run Concurrent program without Using SRS Window, askhareesh blog for Oracle Apps

 Save your changes and navigate to the responsibility.

Run Concurrent program without Using SRS Window, askhareesh blog for Oracle Apps


Double click on the prompt then SRS window with your concurrent program will pop up directly.

Run Concurrent program without Using SRS Window, askhareesh blog for Oracle Apps


Read More »
*/

Read Only Responsibility using Custom.pll in Oracle Applications

Read Only Responsibility using Custom.pll in Oracle Applications, www.askhareesh.com
Add the following code in Procedure Event for the Event Name WHEN-NEW-FORM-INSTANCE in Custom.pll. to make the responsibility of a user read-only. All you need to give/set the responsibility.


BEGIN
   IF EVENT_NAME = 'WHEN-NEW-FORM-INSTANCE'
   THEN
      --Responsibility ID
      IF FND_PROFILE.VALUE ('RESP_ID') = 12345
      THEN
         BEGIN
            COPY ('Entering app_form.query_only_mode.', 'global.frd_debug');
            --QUERY_ONLY="YES"
            COPY ('YES', 'PARAMETER.QUERY_ONLY');
            --Disabling the save and accept standard menus in form
            APP_MENU2.SET_PROP ('FILE.SAVE', ENABLED, PROPERTY_OFF);
            APP_MENU2.SET_PROP ('FILE.ACCEPT', ENABLED, PROPERTY_OFF);
            -- Get the current form
            FORM_NAME := NAME_IN ('system.current_form');
            --Get the current block
            BLOCK_NAME := GET_FORM_PROPERTY (FORM_NAME, FIRST_BLOCK);

            --loop to get all datablocks in current form
            WHILE (BLOCK_NAME IS NOT NULL)
            LOOP
               IF (GET_BLOCK_PROPERTY (BLOCK_NAME, BASE_TABLE) IS NOT NULL)
               THEN
                  --Set insert, update and delete not allowed
                  SET_BLOCK_PROPERTY (BLOCK_NAME,
                                      INSERT_ALLOWED,
                                      PROPERTY_FALSE);
                  SET_BLOCK_PROPERTY (BLOCK_NAME,
                                      UPDATE_ALLOWED,
                                      PROPERTY_FALSE);
                  SET_BLOCK_PROPERTY (BLOCK_NAME,
                                      DELETE_ALLOWED,
                                      PROPERTY_FALSE);
               END IF;

               BLOCK_NAME := GET_BLOCK_PROPERTY (BLOCK_NAME, NEXTBLOCK);
            END LOOP;
         END QUERY_ONLY_MODE;
      END IF;
   END IF;
END;

Also read : Oracle recommendation method to make read only responsibility
Also read : How to compile custom.pll in Oracle Apps R12

Read More »
*/

Form Personalization : Calling PL/SQL Procedure Part2

Enters details as below in condition tab.

Form Personalization : Calling PL/SQL Procedure

Navigate to Actions tab and enter the info as below.
Form Personalization : Calling PL/SQL Procedure

Argument to Copy:
='DECLARE
BEGIN
   TEST_ITEM_PROC (
      '''||${ITEM.MTL_SYSTEM_ITEMS.INVENTORY_ITEM_MIR.VALUE}||''',
      '''||${ITEM.MTL_SYSTEM_ITEMS.DESCRIPTION_MIR.VALUE}||''');
END '

Save the changes, reopen the form, create one item and test in the custom table.

Form Personalization : Calling PL/SQL Procedure


Read More »
*/

Form Personalization : Calling PL/SQL Procedure

Requirement is just like to insert item details in custom table along with in base table MTL_SYSTEM_ITEMS_B.

Table :
CREATE TABLE TEST_ITEM_TBL
(
   ITEM          VARCHAR2 (100),
   DESCRIPTION   VARCHAR2 (100)
);

Procedure:
CREATE OR REPLACE PROCEDURE TEST_ITEM_PROC (P_ITEM VARCHAR2, P_DESC VARCHAR2)
IS
   V_ITEM   VARCHAR2 (100);
BEGIN
   BEGIN
      SELECT ITEM
        INTO V_ITEM
        FROM TEST_ITEM_TBL
       WHERE ITEM = P_ITEM;
   EXCEPTION
      WHEN OTHERS
      THEN
         V_ITEM := NULL;
   END;

   IF V_ITEM IS NULL
   THEN
      INSERT INTO TEST_ITEM_TBL (ITEM, DESCRIPTION)
           VALUES (P_ITEM, P_DESC);
   END IF;

   COMMIT;
END TEST_ITEM_PROC;

Navigation: Inventory Vision Operations --> Items --> Master Items
Form Personalization : Calling PL/SQL Procedure

Navigation: Help --> Diagnostics --> Custom Code --> Personalize
Form Personalization : Calling PL/SQL Procedure


Read More »
*/

How To enable ZOOM button In Oracle Apps : Part2

To know block and item name:

How To enable ZOOM trigger In Oracle Apps, askhareesh blog for Oracle Apps

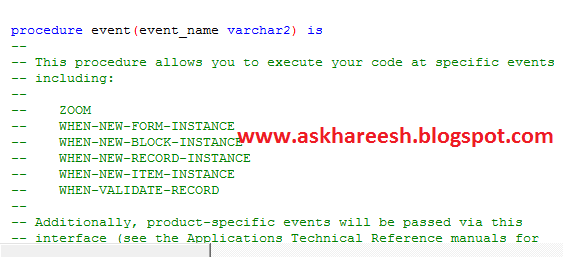
Open CUSTOM.pll body using form builder.
How To enable ZOOM trigger In Oracle Apps, askhareesh blog for Oracle Apps

Replace the above code with below code.
How To enable ZOOM trigger In Oracle Apps, askhareesh blog for Oracle Apps

Code to Copy:
  form_name VARCHAR2(30):=NAME_IN('system.current_form');
  block_name VARCHAR2(30):=NAME_IN('system.current_block');
  item_name VARCHAR2(30):=NAME_IN('system.current_item');

BEGIN
   IF (    form_name = 'POXPOEPO'
       AND block_name = 'PO_LINES'
       AND item_name = 'MARKET_PRICE')
   THEN
      RETURN TRUE;
   ELSE
      RETURN FALSE;
   END IF;

Copy the CUSTOM.pll to resources path and compile.
Open the Purchase Orders form and move to Price reference tab -->
Market price to see the zoom button.
How To enable ZOOM trigger In Oracle Apps, askhareesh blog for Oracle Apps


Read More »
*/

Form Personalization - How to Change Field Name : Part2

Action Tab
Seq:- 10
Type:- Property
Description:- 
Language***:- All
Object Type:- Item
Target Object:- PERSON.HIRE_DATE (Search with string that we copied from step a)
Property Name:- PROMPT_TEXT
Value:- ABCD

 ***  Select 'All' to have the action processed for any language, or select a specific language.Generally text-related personalizations are applied for a specific language.

Form Personalization - How to Change Field Name, askHareesh blog for Oracle Apps

c) Validate the design and click on Apply Now.

Note1: Since we have selected processing mode as 'Both', hence the field name 'ABCD' will appear under both the condition 'New form is open' and  'Enter-Query Mode'.

If we select the processing mode as 'Only in Enter-Query Mode', then we will see the original name of the field while opening the form.Where as  if we query the form it will execute the trigger event and change the name of the field.
Form Personalization - How to Change Field Name, askHareesh blog for Oracle Apps


Form Personalization - How to Change Field Name, askHareesh blog for Oracle Apps

Note2: Each Rule consists of one or more Scope rows, and one or more Actions. If a Rule has no Scope rows or Action rows, it is not processed. Note that upon saving a Rule, if no Scope rows have been entered the form will automatically create a row at the Site level. If any scope matches the current runtime context then the Rule will be processed.
Read More »
*/

System Variables in Oracle Forms : Part3

System Variables in Oracle Forms, www.askhareesh.com
SYSTEM.MOUSE_BUTTON_SHIFT_STATE : Indicates the key that was pressed during the click, such as SHIFT, ALT, or CONTROL. The value is always a character string.

SYSTEM.MOUSE_CANVAS : If the mouse is in a canvas, SYSTEM.MOUSE_CANVAS represents the name of that canvas as a CHARvalue. If the mouse is in an item, this variable represents the name of the canvas containing the item.
SYSTEM.MOUSE_CANVAS is NULL if:
• the mouse is not in a canvas
• the platform is non-GUI

SYSTEM.MOUSE_FORM : If the mouse is in a form module, SYSTEM.MOUSE_FORM represents the name of that form module as a CHAR value. For example, if the mouse is in Form_Module1, the value for SYSTEM.MOUSE_ITEM isFORM_MODULE1.
Note: SYSTEM.MOUSE_FORM is NULL if the platform is not a GUI platform.

SYSTEM.MOUSE_ITEM : If the mouse is in an item, SYSTEM.MOUSE_ITEM represents the name of that item as a CHAR value. For example, if the mouse is in Item1 in Block2, the value for SYSTEM.MOUSE_ITEM is :BLOCK2.ITEM1.
SYSTEM.MOUSE_ITEM is NULL if:
• the mouse is not in an item
• the platform is not a GUI platform

SYSTEM.MOUSE_RECORD : If the mouse is in a record, SYSTEM.MOUSE_RECORD represents that record's record number as aCHAR value.
Note: SYSTEM.MOUSE_RECORD is 0 if the mouse is not in an item (and thus, not in a record).

SYSTEM.MOUSE_RECORD_OFFSET : If the mouse is in a record, SYSTEM.MOUSE_RECORD_OFFSET represents the offset from the first visible record as a CHAR value.
For example, if the mouse is in the second of five visible records in a multi-record block,SYSTEM.MOUSE_RECORD_OFFSET is 2. (SYSTEM.MOUSE_RECORD_OFFSET uses a 1-based index).
Note: SYSTEM.MOUSE_RECORD_OFFSET is 0 if the mouse is not in an item (and thus, not in a record).

SYSTEM.MOUSE_X_POS : Represents (as a CHAR value) the x coordinate of the mouse in the units of the current form coordinate system. If the mouse is in an item, the value is relative to the upper left corner of the item's bounding box. If the mouse is on a canvas, the value is relative to the upper left corner of the canvas.
Note: SYSTEM.MOUSE_X_POS is always NULL on character mode platforms.

SYSTEM.MOUSE_Y_POS : Represents (as a CHAR value) the y coordinate of the mouse, using units of the current coordinate system. If the mouse is in an item, the value is relative to the upper left corner of the item's bounding box. If the mouse is on a canvas, the value is relative to the upper left corner of the canvas.
Note: SYSTEM.MOUSE_Y_POS is always NULL on character mode platforms.

SYSTEM.RECORD_STATUS : Represents the status of the record where the cursor is located. The value can be one of four character strings:
• CHANGED - Indicates that a queried record's validation status is Changed.
• INSERT - Indicates that the record's validation status is Changed and that the record does not exist in the database.
• NEW - Indicates that the record's validation status is New.
• QUERY - Indicates that the record's validation status is Valid and that it was retrieved from the database.

SYSTEM.SUPPRESS_WORKING* : suppresses the "Working..." message in Runform, in order to prevent the screen update usually caused by the display of the "Working..." message. The value of the variable is one of the following two CHARvalues:
• TRUE - Prevents Oracle Forms from issuing the "Working..." message.
• FALSE - Allows Oracle Forms to continue to issue the "Working..." message.

SYSTEM.TRIGGER_BLOCK : Represents the name of the block where the cursor was located when the current trigger initially fired. The value is NULL if the current trigger is a Pre- or Post-Form trigger. The value is always a character string.

SYSTEM.TRIGGER_ITEM : Represents the item (BLOCK.ITEM) in the scope for which the trigger is currently firing. When referenced in a key trigger, it represents the item where the cursor was located when the trigger began. The value is always a character string.

SYSTEM.TRIGGER_RECORD : Represents the number of the record that Oracle Forms is processing. This number represents the record's current physical order in the block's list of records. The value is always a character string.
All system variables, except the four indicated with an asterisk (*), are read-only variables. These four variables are the only system variables to which you can explicitly assign values.

Date and Time System Default Values

Oracle Forms also supplies six special default values -- $$DATE$$, $$DATETIME$$, $$TIME$$, $$DBDATE$$, $$DBDATETIME$$, and $$DBTIME$$ -- that supply date and time information and have special restrictions on their use:
• If you're building client/server applications, consider the performance implications of going across the network to get date and time information.
• If you're accessing a non-ORACLE datasource, avoid using $$DBDATE$$ and$$DBDATETIME$$. Instead, use a When-Create-Record trigger to select the current date in a datasource-specific manner.
• Use $$DATE$$, $$DATETIME$$, and $$TIME$$ to obtain the local system date/time; use$$DBDATE$$, $$DBDATETIME$$, and $$DBTIME$$ to obtain the database date/time, which may differ from the local system date/time if, for example, you're connecting to a remote database in a different time zone.
• Use these variables only to set the value of the Default Value, Range Low Value or Range High Value property.

$$DATE$$ : Retrieves the current operating system date. You can use $$DATE$$ to designate a default value or range for a text item using the Default or Range property. The text item must be of the CHAR, DATE, or DATETIME data type. You also can use $$DATE$$ as a default value for form parameters. In this case, the parameter's value is computed once, at form startup.

$$DATETIME$$ : Retrieves the current operating system date and time. You can use $$DATETIME$$ to designate a default value or range for a text item using the Default or Range property. The text item must be of the CHAR or DATETIME data type. You also can use $$DATETIME$$ as a default value for form parameters. In this case, the parameter's value is computed once, at form startup.
The difference between $$DATE$$ and $$DATETIME$$ is that the time component for $$DATE$$is always fixed to 00:00:00, compared to $$DATETIME$$, which includes a meaningful time component, such as 09:17:59.
Note: Do not use $$DATETIME$$ instead of $$DATE$$ unless you plan to specify the time component. If, for example, you use $$DATETIME$$ with the default DATE format mask of DD-MON-YY, you would be committing values to the database that the user would not see, because the format mask does not include a time component. Then, because you had committed specific time information, when you later queried on date, the values would not match and you would not return any rows.

$$DBDATE$$ : Retrieves the current database date. You can use $$DBDATE$$ to designate a default value or range for a text item using the Default or Range property. The text item must be of the CHAR, DATE, orDATETIME data type.

$$DBDATETIME$$ : Retrieves the current date and time from the local database. You can use $$DBDATETIME$$ to designate a default value or range for a text item using the Default or Range property. The text item must be of the CHAR or DATETIME data type.

$$DBTIME$$ : Retrieves the current time from the local database. You can use $$DBTIME$$ to designate a default value or range for a text item using the Default or Range property. The text item must be of the CHAR orTIME data type.

$$TIME$$ : Retrieves the current operating system time. You can use $$TIME$$ to designate a default value or range for a text item using the Default or Range property. The text item must be of the CHAR or TIMEdata type.
You also can use $$TIME$$ as a default value for form parameters. In this case, the parameter's value is computed once, at form startup.

Local Variables

Because system variables are derived, if the value is not expected to change over the life of the trigger, you can save the system value in a local variable and use the local variable multiple times.


Read More »
*/

System Variables in Oracle Forms : Part2

System Variables in Oracle Forms, www.askhareesh.com
SYSTEM.DATE_THRESHOLD* : Represents the database date requery threshold. This variable works in conjunction with the three system variables $$DBDATE$$, $$DBDATETIME$$, and $$DBTIME$$, and controls how often Oracle Forms synchronizes the database date with the RDBMS. The value of this variable must be specified in the following format: MI:SS .
Because frequent RDBMS queries can degrade performance, it is best to keep this value reasonably high. However, keep in mind that if the value is not synchronized often enough, some time discrepancy can occur. In addition, if you are building a client-server application, the performance implications ofSYSTEM.DATE_THRESHOLD could vary depending on the complexity of your network configuration.

SYSTEM.EFFECTIVE_DATE* : Represents the effective database date. The variable value must always be in the following format:
DD-MON-YYYY HH24:MI:SS .

SYSTEM.EVENT_WINDOW : The SYSTEM.EVENT_WINDOW system variable represents the name of the last window that was affected by an action that caused one of the window event triggers to fire. The following triggers cause this variable to be updated:
• WHEN-WINDOW-ACTIVATED
• WHEN-WINDOW-CLOSED
• WHEN-WINDOW-DEACTIVATED
• WHEN-WINDOW-RESIZED
From within these triggers, you can assign the value of the variable to any of the following:
• global variable
• parameter
• variable
• item, including a null canvas item

SYSTEM.FORM_STATUS : Represents the status of the current form. The value can be one of three character strings:
• CHANGED - Indicates that the form contains at least one block with a Changed record. The value ofSYSTEM.FORM_STATUS becomes CHANGED only after at least one record in the form has been changed and the associated navigation unit has also changed.
• NEW - Indicates that the form contains only New records.
• QUERY - Indicates that a query is open. The form contains at least one block with QUERY records and no blocks with CHANGED records.

SYSTEM.LAST_FORM : Represents the form module ID of the previous form in a multi-form application, where multiple forms have been invoked using OPEN_FORM. The value can be one of two character strings: either the form module ID or NULL.

SYSTEM.LAST_QUERY : Represents the query SELECT statement that Oracle Forms most recently used to populate a block during the current Run form session. The value is always a character string.

SYSTEM.LAST_RECORD : Indicates whether the current record is the last record in a block's list of records. The value is one of the following two CHAR values:
• TRUE - Indicates that the current record is the last record in the current block's list of records.
• FALSE - Indicates that the current record is not the last record in the current block's list of records.

SYSTEM.MASTER_BLOCK : This system variable works with its companion SYSTEM.COORDINATION_OPERATION to help an On-Clear-Details trigger determine what type of coordination-causing operation fired the trigger, and on which master block of a master-detail relation. The values of the two system variables remain constant throughout the clearing phase of any block synchronization. SYSTEM.MASTER_BLOCK represents the name of the driving master block, and SYSTEM.COORDINATION_OPERATION represents the coordination-causing event that occurred on the master block.
More details are in the description for SYSTEM.COORDINATION_OPERATION.

SYSTEM.MESSAGE_LEVEL* : Represents one of the following message severity levels: 0, 5, 10, 15, 20, or 25. The value is always a character string.
During a Runform session, Oracle Forms suppresses all messages with a severity level that is the same or lower (less severe) than the indicated severity level.
Assign a value to the SYSTEM.MESSAGE_LEVEL system variable with standard PL/SQL syntax:
:System.Message_Level := value;
The legal values for SYSTEM.MESSAGE_LEVEL are 0, 5, 10, 15, 20, and 25. Oracle Forms does not suppress prompts or vital error messages, no matter what severity level you select.

SYSTEM.MODE : SYSTEM.MODE indicates whether the form is in Normal, Enter Query, or Fetch Processing mode. The value is always a character string.
• NORMAL - Indicates that the form is currently in normal processing mode.
• ENTER-QUERY - Indicates that the form is currently in Enter Query mode.
• QUERY - Indicates that the form is currently in fetch processing mode, meaning that a query is currently being processed.

SYSTEM.MOUSE_BUTTON_PRESSED : Indicates the number of the button that was clicked. Mouse button support is limited to buttons 1 and 2 (left or middle) on a three button mouse. The value is always a character string.

Read More »
*/

How To enable ZOOM button In Oracle Apps

By default, the ZOOM button is in disabled mode.We need to do modifications in the CUSTOM.pll .
How To enable ZOOM trigger In Oracle Apps, askhareesh blog for Oracle Apps

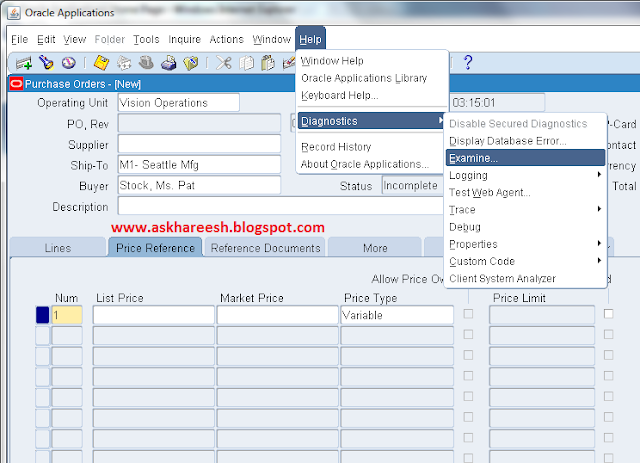
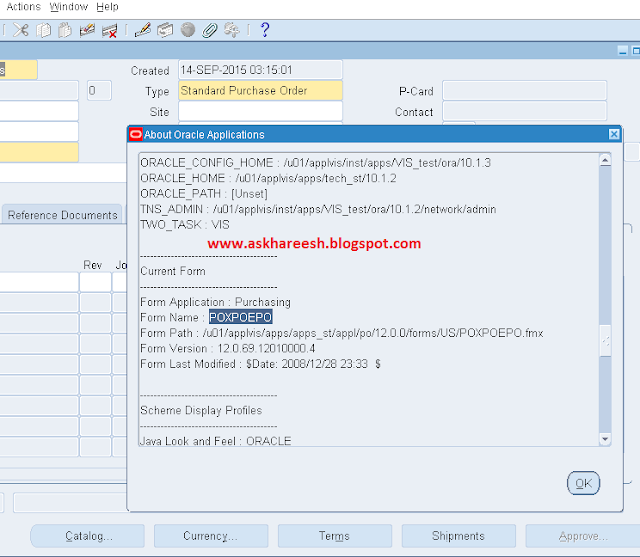
I would like to enable this zoom button in the purchase orders form, when cursor is in Market Price Item in Price Reference tab only. For this, we need to know form name, block name and item name.
To know the form name:
Open form --> Navigation: Purchasing Vision Operations --> Purchase Orders --> Purchase Orders
Help menu --> About Oracle Applications
How To enable ZOOM trigger In Oracle Apps, askhareesh blog for Oracle Apps
http://www.askhareesh.com/


Read More »
*/

Form Customization: How to Hide an option from Help Menu using CUSTOM.pll

We can hide Record History and About Oracle Applications options from Help menu in Oracle Applications forms through form customization using CUSTOM.pll .

I would like to hide Record History and About Oracle Applications options in Purchase Orders form.
Before doing the changes, options are enabled like below.
Form Customization: How to Hide an option from Help Menu using CUSTOM.pll, askhareesh blog for Oracle Apps

Open the CUSTOM.pll using form builder and done the changes in procedure event  like below.
Form Customization: How to Hide an option from Help Menu using CUSTOM.pll, askhareesh blog for Oracle Apps 


Form Customization: How to Hide an option from Help Menu using CUSTOM.pll, askhareesh blog for Oracle Apps
 Change the code as below.

Form Customization: How to Hide an option from Help Menu using CUSTOM.pll, askhareesh blog for Oracle Apps
Code to copy:
  v_user_name VARCHAR2(100):=NULL;
  form_name      VARCHAR2(30) := NAME_IN('system.current_form');
BEGIN
   --null;
   v_user_name := fnd_global.user_name;
   IF (v_user_name = 'OPERATIONS')
   THEN
      IF (FORM_NAME = 'POXPOEPO')
      THEN
         SET_MENU_ITEM_PROPERTY ('HELP.RECORD_HISTORY',ENABLED,PROPERTY_FALSE);
         SET_MENU_ITEM_PROPERTY ('HELP.ABOUT_ORACLE_APPLICATIONS',ENABLED,PROPERTY_FALSE);
      END IF;
   END IF;

Compile the CUSTOM.pll and open Purchase Orders form now. You can observe that Record History and About Oracle Applications options are disabled.

Form Customization: How to Hide an option from Help Menu using CUSTOM.pll, askhareesh blog for Oracle Apps
Read More »
*/

How to set Item property dynamically in oracle forms

How to set Item property dynamically in oracle forms, www.askhareesh.com
For restrict Insert/Update in item:
SET_ITEM_PROPERTY(‘TRANS_ID’,INSERT_ALLOWED,PROPERTY_FALSE);
SET_ITEM_PROPERTY(‘TRANS_ID’,UPDATE_ALLOWED,PROPERTY_FALSE);

For set required property No in item:
SET_ITEM_PROPERTY(‘TRANS_ID’,REQUIRED,PROPERTY_FALSE);

For set Enabled/Disabled item:
SET_ITEM_PROPERTY(‘TRANS_ID’,ENABLED,PROPERTY_FALSE);

For any color to Item:
Set_Item_Instance_Property( ‘TRANS_ID’, CURRENT_RECORD,VISUAL_ATTRIBUTE,’VISUAL_ATTRIBUTE_NAME’);


Read More »
*/

Forms Personalization Tables

Forms Personalization Tables, www.askhareesh.com
When any Forms Personalization is done the following tables will be populated

FND_FORM_CUSTOM_RULES
FND_FORM_CUSTOM_SCOPES
FND_FORM_CUSTOM_ACTIONS
FND_FORM_CUSTOM_PARAMS
FND_FORM_CUSTOM_PROP_VALUES
FND_FORM_CUSTOM_PROP_LIST

Query to get  list all the forms in Oracle Applications that have been customized using Forms Personlization:


  SELECT DISTINCT A.FORM_NAME,
                  A.ENABLED,
                  C.USER_FORM_NAME,
                  D.APPLICATION_NAME
    FROM FND_FORM_CUSTOM_RULES A,
         FND_FORM B,
         FND_FORM_TL C,
         FND_APPLICATION_TL D
   WHERE     ENABLED = 'Y'
         AND A.FORM_NAME = B.FORM_NAME
         AND B.FORM_ID = C.FORM_ID
         AND B.APPLICATION_ID = D.APPLICATION_ID
ORDER BY APPLICATION_NAME;


Read More »
*/

Benefits and Limitations of forms personalization

Benefits and Limitations of forms personalization, askhareesh blog for Oracle Apps
Benfits
  • Multiple users can develop forms personalization at any given point in time.
  • It is fairly easy to enable and disable forms personalizations.
  • A programmer is not required to do simple things such as hide/disable fields or buttons.
  • Provides more visibility on customizations to the screen.
Limitations
  • Can't create record group queries, hence can't implement LOV Query changes.
  • Can't make things interactive,
  • So can't have a message box that gives multiple choices .


Read More »
*/

Form compilation syntax in Oracle Apps

Form compilation syntax in Oracle Apps, askhareesh blog for Oracle Apps

Compile forms in R12
command:

frmcmp_batch userid=apps/apps module=XXPOFORM.fmb output_file=$PO_TOP/forms/US/XXPOFORM.fmx module_type=form batch=no compile_all=yes


Compile forms in 11i
command:

f60gen userid=apps/apps module=XXPOFORM.fmb output_file=$PO_TOP/forms/US/XXPOFORM.fmx module_type=form batch=no compile_all=yes


Read More »
*/

Introduction to Forms

Introduction to Forms,AskHareesh Blog for OracleApps

  • Native frontend tool of Oracle.
  • Supports PL/SQL coding.
  • Supports communication with database.
  • Supports all database objects of SQL and PL/SQL ( Tables, Views, Synonym, Sequence, Triggers, Sub programs)
  • Supports to view and define database objects from forms environment.
  • Supports to share properties of controls using visual attributes and property classes.
  • Supports OOPS features.
  • Supports to share application with multiple users and multiple platforms.
Developer 10g  suite
It consists of three components
Oracle Forms
Used to develop user friendly application screens for data manipulations and retrieval purpose.
Oracle Reports
Used to represent information for read only purpose in a user friendly format.
Oracle Graphics
Used to represent the information in char formar with X and Y co-ordinates.

Forms 10g
Supports to manipulate data or retrieve data available in RDBMS.


    Interfaces in forms
  • Object Navigator  ( F3 )
Allows to create components and navigate between other screens of forms.
  • Layout Editor  ( F2 )
Used to design application screens. Supports to create controls ( GUI Controls).
  •  Property pallete ( F4 )
Used to assign properties for controls.
  • PL/SQL Editor ( F11 )
Used to provide code for procedures, functions, packages, triggers.
  • Menu Editor
Used to design menus.
  • Wizards
Used to  make components like blocks, canvas, charts, LOV.
Form Components
                There are two important forms components.
  • Blocks
  • Canvas
  • Blocks
Represents collection of controls (items).
There are two types of blocks
  • Base table block
  • Control block
  • Base table block
Block created based on table, view or synonym or stored procedure.
  • Control block
Block created without any table. It will not represent any table.
Control blocks are created manually.
    2)  Canvas
          Used to hold block items. It is a container which can hold more than one block on it.
          Canvas can be created through layout wizard or manually.
Note
  • The default type of canvas is content canvas.
  • Default type of item is text item.
  • Text item:   It is an editable control, used to represent column of a table.
  • At least one content or tab canvas must be there to run the application.
  • At least one editable item must be available to run the application.
  • Whenever base table block is created in a form, it automatically frames an internal insert, update, delete and select statements.
Shortcut keys
ctrl + s save the FMB file
ctrl + t compiles the FMB file and gives FMX file
ctrl + r Runs FMX file ( Gives the final output )
F8 Execute the query ( used to retrieve the data from table

Wizards
Data block wizard  --  Used for creating datablock.
Layout wizard        --  used for creating  Canvas.
LOV wizard            -- used for creating list of values
Chart wizard         -- used for creating chart.
Report   wizard     --  used for creating wizard.
Create your first form using wizard
Form Builder Tool
Open the "Form Builder" tool.
Welcome window
You will get the ‘Welcome to the Form Builder’ window.
Use the data Block Wizard, ( Tools Data block wizard )
You will get  ‘welcome to the the data block wizard’
Next table or view Enter the table name EMP
Refresh provide connection details ( user name , password and host string )
Move all the columns from available columns to database items
Data block name ( let it be same as table name  )   create data block then call layout wizard 
finish.
We are done with datablock wizard , You will get ‘welcome to layout wizard’
Canvas – ( new canvas )  Type – content
Next Move all items from available items to displayed items Next Next Select form
Frame tile – Emp Details Next Finish
We are done with layout wizard
Go to  File - Save As - Create new folder in desktop  with the name MY_FORMS
  Save the  file with the name  EMP_FORM.fmb
Important is to observe the object navigator ( Press F3 )
You can see under forms  your form name i.e. EMP_FORM
Under form, data block is created i.e. EMP ( Data block refers to table )
Under data block, i.e. you find Item ( Item refers to columns in the table )
Under canvases, you can see a canvas
Under Canvas, you can see the frame
Understand hierarchy. It is simple.
Now, Compile the form.
In the Menu, Go to Program -   Compile Module ( Ctrl + T )
In your desktop, in your folder MY_FORMS , Observe  .fmx file is generated.
Note:
When we compile fmb file,  fmx file is generated.
To run the form, start the listener /  Start OC4J listener
Now, Run the form
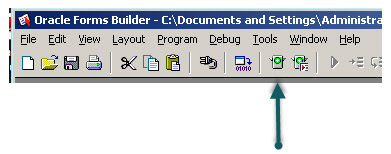
Click on Run Form Icon.


It will prompt to install Jinitiator, Install it.
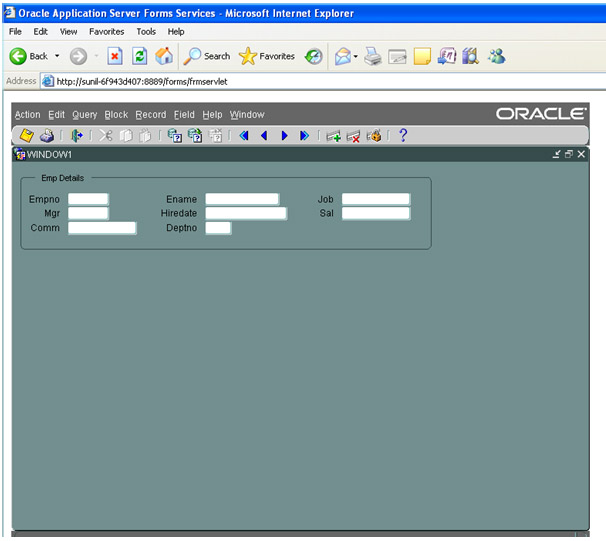
Your Form is opened in the browser.


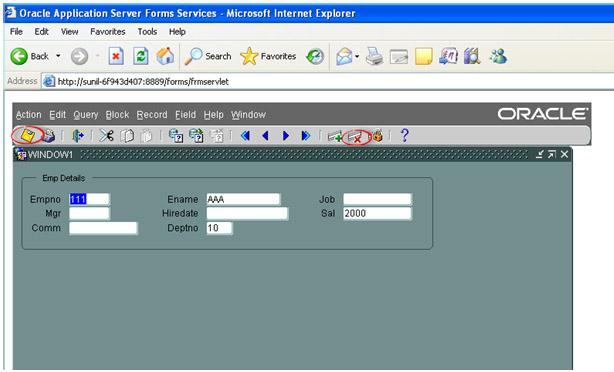
Now, Enter values in few fields like  empno, ename ,sal , deptno, click on save.
You get a message, Transaction complete: 1 record applied and saved.
Now check your EMP table in the database,  you can see the new row is inserted.


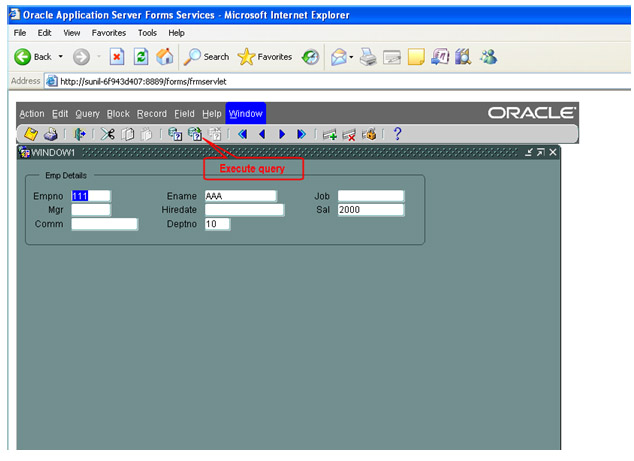
To look at all the rows in the emp table, click on execute query


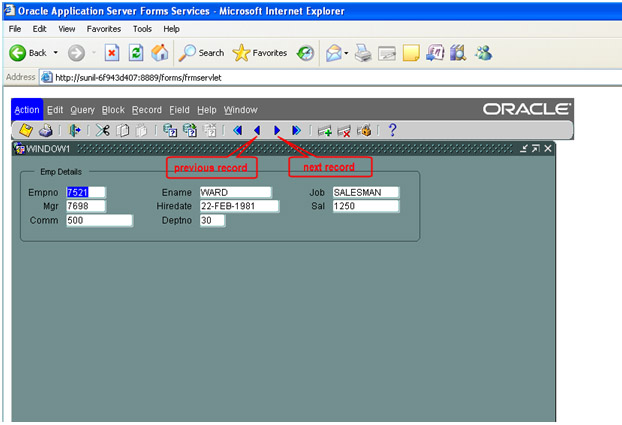
To look at the next row click on next record.
To look at previous row click on previous record button.

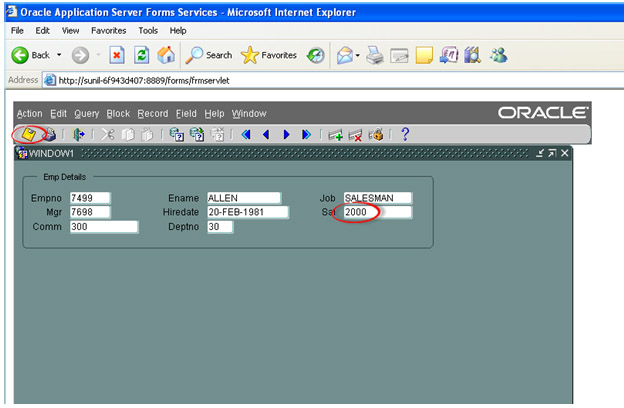
To change the salary of ALLEN from 1600 to 2000.
Go to ALLEN record, change the value of sal field to 2000.
Click on save button.

To delete the row of empno 111, traverse the record, click on delete button and save.

Look at the EMP  table , empno 111 is deleted.
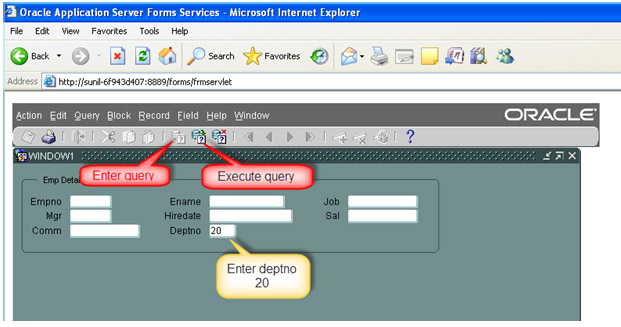
To see the details of all the employees working in deptno 20.
Click on Enter query
Enter deptno 20
Click on Execute query
Now, when you click on next record, you will get only the records working in deptno 20.

Assignment
Create a table rail_reservation, with the following columns
Train_no, coach_id, seat_no, doj, pname, age, gender, from_stn, to_stn, timing,  ticked_id, fare
Create FORM using rail_reservation table.
Perform the following actions
    • Add new reservations
    • Change Date of Journey
    • Cancel ticket. ( Remove )
    • See the passenger details of particular train/ doj / to_stn
Read More »
*/